Best Video Editing Software in Ubuntu: Ubuntu is a popular Linux distribution. It’s widely used by developers, content creators, and multimedia pros.
One of its standout features is the extensive support for open-source software, making it a viable choice for video editing.
Ubuntu is different from Windows and macOS. Users there can access software like Adobe Premiere Pro and Final Cut Pro.
On Ubuntu, it relies on a strong community of developers who create powerful and efficient video editing software.
Using video editing software in ubuntu has many benefits. Most tools are free and open-source. They also allow for flexible customization.
If you’re looking to edit videos on Ubuntu, there are several feature-rich video editors available. These tools come in different types.
Some are easy for beginners and feature drag-and-drop functionality. Others are designed for professionals, with advanced compositing and special effects.
In this guide, we’ll explore some of the best video editing software in Ubuntu, their key features, pros and cons, and how they compare against each other.
No matter if you’re a hobbyist or a pro video editor, this list will help you find the best tool to meet your needs.
Top 8 Video Editing Software in Ubuntu
- Kdenlive
- OpenShot
- Shotcut
- Lightworks
- Blender (Video Sequence Editor)
- Flowblade
- Cinelerra-GG Infinity
- Olive Video Editor
1. Kdenlive
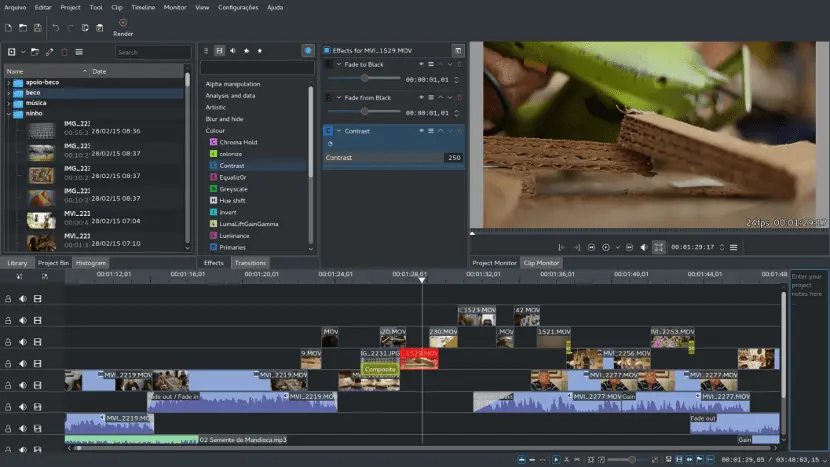
Kdenlive stands for KDE Non-Linear Video Editor. It is a popular and powerful video editing tool for Ubuntu.
Kdenlive is an open-source video editing software created by the KDE project. It offers professional-grade features for free.
This software is ideal for users who want a balance between simplicity and power. It provides a non-linear editing space.
This lets users handle several video and audio tracks separately. Kdenlive is widely used for projects ranging from small personal clips to full-fledged film production.
One of Kdenlive’s standout features is its broad compatibility with video formats, including MP4, AVI, MOV, and MKV.
It also provides access to a wide array of transitions, effects, and audio controls. The software is updated regularly, ensuring that users get the latest enhancements and bug fixes.
Kdenlive caters to both beginners who want to make simple edits and professionals looking for a strong video editing tool.
Key Features:
- Multi-track video editing with a powerful timeline.
- Wide format support, including various codecs.
- Customizable interface for an improved workflow.
- A rich collection of transitions and effects.
Pros:
- Free and open source.
- Active community support and frequent updates.
- Highly customizable for professional workflows.
Cons:
- Occasional stability issues with large projects.
- Rendering speeds can be slow on older hardware.
How to install kdenlive on ubuntu:
sudo apt install kdenlive2. OpenShot
OpenShot is a simple but powerful video editing tool. It’s made for users who want an easy and intuitive interface.
The software is aimed at beginners but includes enough features to satisfy intermediate users as well.
OpenShot is different from other Linux video editors. It’s easy to use and lets you drag and drop files. The software allows users to quickly trim, cut, and edit videos without a steep learning curve.
A key feature of OpenShot is its cross-platform support. Users can work on Windows, macOS, and Linux using the same workflow.
The software works with many audio, video, and image formats. This lets users make high-quality videos without worrying about format limits.
OpenShot also has built-in animation and keyframe features. This makes it a great choice for users who want to add basic motion graphics to their projects.
Key Features:
- Drag-and-drop support for easy editing.
- Unlimited video and audio tracks.
- 3D title editor for animated text.
- A wide range of transition effects.
Pros:
- User-friendly and beginner-friendly.
- Active community development.
- Cross-platform compatibility.
Cons:
- Lacks advanced features for professional editing.
- Performance may lag with complex projects.
How to install OpenShot on ubuntu:
sudo apt install openshot3. Shotcut
Shotcut is a free, open-source video editor. It works on many platforms. It supports many formats and has an easy-to-use interface.
It balances ease of use with advanced video editing. This makes it great for beginners and experienced users alike.
Shotcut lets you edit directly from the source file. This saves time and boosts workflow efficiency, unlike some video editors that need media to be imported first.
One of Shotcut’s major strengths is its ability to handle high-resolution video files, including 4K. It also offers a wide variety of video and audio effects, making it a versatile choice for content creators.
Shotcut is regularly updated. This means users enjoy the latest in video editing technology.
Key Features:
- Supports native timeline editing without import requirements.
- 4K resolution support for high-quality projects.
- Extensive collection of audio and video filters.
- Wide format support for professional editing.
Pros:
- Open source and free to use.
- Regular updates and active community support.
- No need for media importing before editing.
Cons:
- Interface design is less modern compared to its competitors.
- Performance may slow down with highly complex projects.
How to install Shotcut on ubuntu:
sudo snap install shotcut --classic4. Lightworks
Lightworks is a professional-grade video editing software available for Ubuntu. It has been used in the editing of major Hollywood films and is known for its robust feature set and industry-standard tools.
Lightworks provides a strong non-linear editing setup. Its timeline lets you control video and audio elements precisely. It supports high-resolution formats like 4K and HDR. This makes it a top choice for professionals.
One of Lightworks’ strengths is its efficiency in video rendering and export. It provides real-time effects, advanced trimming, and powerful media management tools. The free version has some limits, like fewer export formats.
The paid version offers full features. Lightworks has a user-friendly interface and lots of features. It’s great for anyone seeking a professional video editing experience on Ubuntu.
Key Features:
- Professional-level editing tools.
- Multi-format support, including 4K.
- Real-time effects and transitions.
- Direct export to YouTube and Vimeo.
Pros:
- High-quality output with professional features.
- Optimized for fast rendering and export.
- Customizable interface for enhanced productivity.
Cons:
- The free version has limited export options.
- The learning curve may be steep for beginners.
How To Install Lightworks on ubuntu:
- Click on the Download DEB or Download RPM button.
- Opening .deb pop-up window will appear
- Select Open with Software Install (default) and click OK to continue
- Lightworks Installer pop-up window will appear
- Click Install
- Authentication Required – Enter your password and click Authenticate
- Lightworks will start installing.
5. Blender (Video Sequence Editor)
Blender is widely known for its strong 3D modeling and animation features. It also has a Video Sequence Editor (VSE) that offers advanced video editing tools.
This makes Blender a unique option for users who want to integrate 3D animation with video editing. The VSE focuses on 3D creation. It also has important video editing features. You can cut, trim, mask, adjust colors, and sync audio.
The Blender VSE lets you edit high-resolution videos. It also has a node-based compositing system. This feature helps users make complex visual effects.
The software supports Python scripting. This feature allows for automation and customization. It’s a versatile choice for professionals in animation and VFX projects.
Key Features:
- Advanced 3D creation tools are integrated with video editing.
- Support for multi-track editing and masking.
- Node-based compositing for visual effects.
- Python API for scripting and automation.
Pros:
- Ideal for combining 3D animation with video editing.
- Highly customizable and scriptable.
- Regular updates and strong community support.
Cons:
- Complex interface with a steep learning curve.
- Lacks some traditional video editing features that are found in dedicated software.
How To Install Blender on Ubuntu:
sudo apt install blender6. Flowblade
Flowblade is a lightweight, fast, and precise non-linear video editor for Linux, including Ubuntu. It provides a smooth editing process, which is efficient for both small and large video projects.
Flowblade uses a “magnetic timeline” for clip management. This differs from other video editors that offer a more flexible timeline.
Flowblade is designed for top performance. It includes tools for advanced compositing, color correction, and image filtering.
It supports multiple video and audio tracks, allowing users to create layered edits with precision. Flowblade might not be as well-known as Kdenlive or OpenShot.
However, it’s still a great option for users who want a quick and efficient video editor.
Key Features:
- Magnetic timeline for smooth editing.
- Proxy editing for improved performance with high-resolution footage.
- Advanced compositing and image filters.
- Multi-track support for video and audio layering.
Pros:
- Lightweight and optimized for performance.
- Simple and efficient workflows.
- Good range of effects and transitions.
Cons:
- Less user-friendly than OpenShot.
- Limited community support is compared to larger projects like Kdenlive.
How To Install Flowblade on ubuntu:
sudo apt install flowblade7. Cinelerra-GG Infinity
Cinelerra-GG Infinity is a powerful video editing tool. It offers many features for professional editors and filmmakers. Cinelerra began in the early 2000s.
Since then, it has grown into a strong non-linear editing system. It now competes with commercial software in features.
It supports 8K resolution, advanced compositing, motion tracking, and GPU-accelerated rendering. This makes it one of the most complete video editing tools for Ubuntu.
One of Cinelerra’s key strengths is its ability to handle complex projects with high efficiency. It has a smart interface with many customization options.
This lets users adjust their workflow to fit their needs. The software also has a built-in compositor. This lets users create amazing visual effects right in the editing space.
Cinelerra-GG Infinity has many professional features. However, beginners might find it hard to learn.
Key Features:
- 8K resolution support for high-end video production.
- Advanced compositing and motion tracking.
- GPU-accelerated rendering for faster performance.
- Extensive audio editing and mixing capabilities.
Pros:
- Extremely powerful for professional projects.
- Handles high-resolution footage with ease.
- Highly customizable workflows.
Cons:
- Steep learning curve; not ideal for beginners.
- The interface may feel overwhelming for new users.
8. Olive Video Editor
Olive is an open-source video editor. It offers a professional editing experience. The interface is modern and easy to use.
Olive is still being developed, but it has become popular. Users love its speed, efficiency, and features.
It offers real-time editing and a node-based compositing system. This allows users to create complex effects and transitions easily.
Olive focuses on performance, making it a great choice for users with resource-heavy projects. Unlike other Linux video editors, Olive is optimized for smooth playback and rendering.
This ensures a seamless editing experience. Even in beta, Olive is set to compete with major software like Adobe Premiere Pro and DaVinci Resolve.
Key Features:
- Real-time playback for a smooth editing experience.
- Node-based compositing system for advanced effects.
- Highly optimized for performance and efficiency.
- Modern and intuitive user interface.
Pros:
- Fast and responsive, even with high-resolution footage.
- Offers professional-grade features in an open-source package.
- Actively developed with a growing community.
Cons:
- Still in beta, some features may be incomplete.
- Limited documentation compared to more established software.
How To Install Olive Video Editor on Ubuntu using Snap:
//You have to copy and paste each line seperate

sudo apt update

sudo apt install snapd

sudo snap install --edge olive-editor
Which Video Editor Should You Choose?
Choosing the right video editor for Ubuntu depends on your experience level and the complexity of your projects.
If you are a beginner looking for a simple yet effective tool, OpenShot and Shotcut provide intuitive interfaces and essential features to get started.
OpenShot is especially great for quick edits with its drag-and-drop functionality, while Shotcut offers more advanced capabilities without overwhelming new users.
For intermediate users who require more flexibility and advanced editing tools, Kdenlive and Flowblade are excellent choices.
Kdenlive provides a powerful multi-track timeline, customizable interface, and support for a wide range of formats.
Flowblade, on the other hand, is optimized for speed and efficiency, making it a great option for users working on larger projects.
Professionals working on high-resolution videos and complex projects may prefer Lightworks, Cinelerra-GG Infinity, or Blender’s Video Sequence Editor.
Lightworks has been used in Hollywood films and offers robust editing tools, real-time effects, and multi-format support.
Cinelerra-GG Infinity is a powerhouse for 8K editing, motion tracking, and compositing, while Blender is an excellent choice for users who need video editing combined with 3D animation capabilities.
For those looking for an up-and-coming video editor with a modern interface and high-performance rendering, Olive Video Editor is a promising option.
Though still in development, it is rapidly gaining popularity as a lightweight, professional-grade tool.
Ultimately, the best video editor for you depends on your specific needs, project requirements, and level of experience.
Whether you are a casual user or a professional filmmaker, Ubuntu has a video editor to suit your workflow.
Conclusion
Ubuntu offers a diverse range of video editing software, catering to both beginners and professional users.
Whether you need a simple tool like OpenShot or a high-end solution like Cinelerra-GG Infinity, there is a video editor available for your specific needs.
The open-source nature of most of these applications ensures continuous improvements and community-driven support.
By selecting the right tool based on your requirements and experience level, you can make the most of Ubuntu’s powerful video editing capabilities.
Frequently Asked Questions
What is the best free video editing software for beginners on Ubuntu?
For beginners on Ubuntu, OpenShot is a fantastic choice. Its intuitive interface makes it easy to learn the basics of video editing, even with no prior experience.
You can quickly import video clips, add transitions, create titles, and export your finished project in various formats.
While it may not have all the advanced features of professional software, OpenShot provides a solid foundation for learning video editing principles and is perfect for simple projects.
It’s also completely free and open-source, making it accessible to everyone. Plus, there are many online tutorials available specifically for OpenShot on Ubuntu.
What’s the most powerful video editing software available for Ubuntu?
While “best” is subjective, Kdenlive and the free version of DaVinci Resolve are often considered the most powerful video editing options on Ubuntu.
Kdenlive boasts a wide range of features, including multi-track editing, advanced effects, and a customizable interface.
DaVinci Resolve, while a professional-grade tool with a paid version, also offers a powerful free version that’s more than capable for many users.
It’s known for its color grading tools, but also has excellent editing features. Both require a decent machine for optimal performance.
Is DaVinci Resolve compatible with Ubuntu?
Yes, DaVinci Resolve is compatible with Ubuntu. Blackmagic Design, the developer, offers a Linux version of their software.
However, it’s important to note that DaVinci Resolve, especially the full Studio version, has relatively high system requirements.
Before installing, ensure your Ubuntu system meets the recommended specifications, particularly regarding RAM, GPU, and storage, to avoid performance issues.
Check their website for the most up-to-date compatibility information and system recommendations.
How can I edit 4K video on Ubuntu?
Editing 4K video on Ubuntu is possible with several video editors like Kdenlive, DaVinci Resolve, and Blender.
However, 4K editing is resource-intensive. To achieve smooth playback and rendering, you’ll need a powerful Ubuntu system.
A dedicated graphics card (GPU) with sufficient VRAM, a fast multi-core processor, and ample RAM (at least 16GB, ideally 32GB or more) are highly recommended.
Optimizing your workflow, using proxy editing, and ensuring your storage is fast (SSD) can also significantly improve performance.
Which video editor is best for professional use on Ubuntu?
For professional video editing on Ubuntu, DaVinci Resolve (especially the Studio version) and Kdenlive are frequently used.
DaVinci Resolve is a industry-standard tool known for its advanced color grading and editing features.
Kdenlive, while open-source, is also a powerful option with a wide array of tools and a highly customizable interface, making it suitable for professional workflows.
The “best” choice often depends on the specific needs of the professional and budget.
Are there any command-line video editing tools for Ubuntu?
Yes, FFmpeg is a very powerful command-line tool for video editing and manipulation on Ubuntu.
While it’s not a traditional GUI editor, FFmpeg offers incredible flexibility and control over video processing.
It’s commonly used for tasks like converting video formats, extracting audio, adding watermarks, and performing other complex video manipulations. It does have a steep learning curve.
Which video editors for Ubuntu offer lossless video editing?
Kdenlive and Shotcut are examples of video editors for Ubuntu that offer lossless editing capabilities.
Lossless editing means that the original video quality is preserved during the editing process.
This is particularly important if you’re working with high-quality footage and want to avoid any degradation in image or audio quality.
However, note that final output may still involve lossy compression depending on the export settings.
How do I install a video editor on Ubuntu?
Most video editors can be installed using Ubuntu’s package manager or Snap store. For example:
Kdenlive: sudo apt install kdenlive
OpenShot: sudo apt install openshot
Shotcut: sudo snap install shotcut --classic
Blender: sudo apt install blender


Reading your piece felt like walking through a lush garden of ideas, each one blooming with vibrant insights that invited both contemplation and joy. Your words move with such effortless grace, and the way you bring together seemingly disparate thoughts into a cohesive whole is nothing short of magical. It’s a rare gift to make complex ideas feel so accessible, yet so profound.